
Compensated lenses, especially progressive addition lenses (PALs), are commonplace in today’s optical marketplace and are often promoted as a best visual solution. However, because many ECPs don't fully understand what a compensated prescription is, they struggle to confidently explain how this benefit is a value to the patient.
Here’s what ECPs need to know about compensated lenses and how valuable they are when it comes to optical precision, regardless of what happens in the refraction process.
Download this PDF for a condensed version you can refer to as needed.

The lens compensation misconception
Here’s the misconception about compensated lenses: ECPs often believe that spectacle lens compensation is a change or modification of the lens prescription that was originally determined by the refraction.
This misconception that lens compensation is changing or modifying the prescription from what was originally ordered leads to a few issues: it creates a hesitancy and in some circumstances, a complete lack of use. It can also lead to a lack of trust that the lens contains the proper prescription to help their patients see their best.
In reality, compensated lenses are the best way to provide any spectacle lens wearer the prescription determined by the refraction during the comprehensive eye exam. They provide optical precision not possible with other methods of lens processing, which means patients with a high or complicated prescription will benefit most.
The why behind compensation
To solve the issue, it helps to understand why compensation is performed. This will build trust in the process and confidence to recommend what will ultimately increase the overall satisfaction rating of the ECP practice, and more importantly, the patient.
During any refraction, the ECP will position the patient behind the phoropter and place a series of different lenses in front of the patient’s eyes until a satisfactory prescription is found. For the purpose of this discussion concerning spectacle compensation, it is the size and positioning of these lenses and not the power that is most important to understand. Prescription power is secondary.
When the phoropter is put in front of the patient’s eyes, the lenses of the phoropter are at a set, predictable position. On the vertical axis, the lenses are orthoscopic (perpendicular to the floor) to the patient’s face. On the horizontal axis, the lenes are in a straight horizontal plane. Finally, the distance from the patient’s eye to the lens is a fixed distance. The lenses in the phoropter are small, allowing the patient to be looking through the optimal visual point in that lens.
The refraction process does not perfectly replicate what the wearer will experience when they try on their new glasses for the first time. That’s why compensation is so important. It neutralizes the many little differences that take place from the time of measurement to the try-on. Let’s talk about those.
The differences in positioning have an impact
First, let’s clear up the difference between vertex power and effective power:
- Back vertex power: the power of a spectacle lens as measured by a lensometer.
- Effective power: the power perceived by the wearer as a result of that lens being placed in front of the patient’s eyes.
Altering the position of a lens will change the effective power, or the perceived power of that lens. And, the extra area of the larger lens will provide more room for lens induced aberrations.
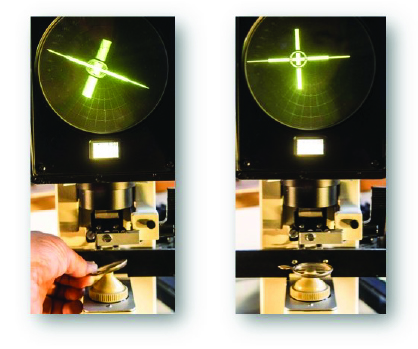
Here is an exercise you can do in office to visually see what is happening by changing these parameters.
- Properly set up your lensometer and prepare it for use.
- Simulate the lens of the phoropter.
- Take a lens of known sphere power (a stock lens or trial lens will do just fine). A 4.00DS power will work great; it doesn’t matter if it is plus (+) or minus (-), as long as it is a sphere and not a spherocylinder power.
- Place the lens in the lensometer and secure it against the aperture with the lens holder or gimbal.
- If you are using a 4.00DS lens, turn the power drum to the corresponding power. Let’s assume we are using a -4.00D lens. The power drum should be on -4.00.
- Look through the eyepiece and view the mires. Both the sphere and cylinder mires are crisp and in focus. Additionally, turning the axis wheel will have no effect on the focus of the mires as this is a sphere lens.
- Simulate placing that same lens in an eyeglass frame.
- Leave the lens in place and the power drum properly focused to -4.00D.
- Manually holding the -4.00D lens in place with your left hand, pull back on the lens holder handle and lock it out of the way with your right hand.
- With your left hand still holding the -4.00D lens, slide the lens a few mm away from the aperture, tilt it vertically to simulate pantoscopic tilt, and angle it horizontally to simulate wrap.
- Now look through the eyepiece and notice that not only are the sphere lines out of focus, you have created cylinder power.
- Still viewing through the eyepiece, turn the power drum and notice the sphere and cylinder power along with its axis you have created.
The lens in Step 2 is an example of back vertex power.
The lens in Step 3 is an example of effective power.
Also, note that you did not change the lens in the lensometer, you only changed its position. Although the patient stated that their best vision was with a -4.00DS prescription, and you ordered a -4.00DS lens, if that lens is not compensated, that patient is not looking through a -4.00DS power. They are looking through the compound prescription you noted in Step 3.
Even when a frame is properly fit on a patient’s face, that frame will place the lenses in a different position as compared to the position of the lenses during the refraction. They will have:
- Pantoscopic tilt: Measured in degrees, this is the tilt in the vertical axis of the frame placing the top of the eye wire further from the face than the bottom.
- Face form or wrap: Measured in degrees, is the curvature of the front of the frame as seen from a top down view.
- Vertex distance: Measured in mm, is the distance from the eye to lens within the frame.

Again, unless compensation of the prescription is performed to neutralize these differences, the patient is forced into a less-than-perfect visual solution. And the larger the differences in positioning, the more troublesome it can be. High prescriptions will only exacerbate the issue.
Compensate wherever possible
The answer here is to use a compensated lens whenever possible. The processing lab understands that there is a difference between the position and size of the lenses during the refraction process, and the position and size of the spectacle lenses placed within the finished product. The lab will then perform prescription compensation to ensure that the change in position and size of the lens does not negatively affect the visual performance or comfort of the lens.
You can dramatically increase the exactness of the compensation by utilizing electronic measuring tools like the Spectangle Pro. Spectangle Pro will provide all measurements needed for a proper fit and give you a simple easy way to demonstrate things like anti-reflective and light reactive lens treatments and multi-pair solutions like indoor PALs and polarized.
Having a thorough understanding of what compensation is and how it is derived will give you the confidence to recommend and explain the benefits of this technology to your patients, transforming it from a benefit to value.
Want more information about compensated lenses? Contact your HOYA Territory Sales Manager for more information.

Did you find this content helpful? Download this PDF for a condensed version you can refer to as needed.